1/2 cup of your favorite tomato sauce
Splash of water (just so the sauce does not thicken too much)
2 eggs (if you would like more, you should add more sauce)
Pinch of dried or fresh chopped parsley
2 tsp parmesan cheese
The Carnivorous Herbivore |
|
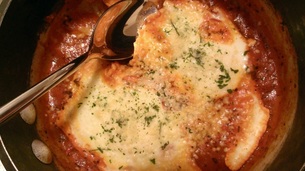
Growing up in my grandmother's Italian kitchen, my mother had this often, but never really made it for us. Eggs baked in tomato sauce is an easy breakfast, lunch or snack that is wonderful with homemade tomato sauce (or tomato gravy, as my grandmother called it!). In a pinch, however, this is also delicious with a prepared jarred sauce. I love it because it's low-carb, and, as a soon-to-be bride, I am trying to tighten my figure! You don't have to keep this low-carb, however. This is delicious with toast, baguette, roll, or any other type of bread that you can dip into the yummy sauce. I cook my eggs to the over-hard stage, but cook yours to taste. You'll need: 1/2 cup of your favorite tomato sauce Splash of water (just so the sauce does not thicken too much) 2 eggs (if you would like more, you should add more sauce) Pinch of dried or fresh chopped parsley 2 tsp parmesan cheese Place the tomato sauce and splash of water in a saucepan or small frying pan with a lid. Mix to combine. Set over medium heat until it boils. Lower the heat, and add the eggs. Cover. Cook for 3-5 minutes, depending on how you like your eggs. Remove from heat, and sprinkle with the parsley and the parmesan. Cover to melt the cheese. Serve and enjoy!
0 Comments
I'm not sure if anyone noticed, but my posts are super simple nowadays. A few reasons for this: 1) I finally got a new job and it has been keeping me really busy. 2) The insane heat wave we've been having--I can't heat up the grill pan if it'll heat my whole apartment to over 100 degrees. 3) Because of #1, I have been starving when I decide what I want, thus my meals have to be quick, easy, and without a lot of prepping. This meal was no exception. I had some hummus in the fridge after last week, and was craving something new. After searching for falafel recipes and finding none that I was impressed with (let alone had the time for), I thought I'd check out what the grocery store had. I decided on veggie burgers as a substitute, and I was pleasantly surprised. I usually find veggie burgers boring and dry. But this preparation really stepped it up a notch--the hummus added flavor and moisture, making this veggie burger something to write home about! Per person, you'll need: 1 whole-wheat pita, sliced in half Hummus (preferably homemade) Chopped lettuce and tomato 1 veggie burger, grilled, or pan-sauted Tahini, to drizzle First, start heating the veggie burger according to package directions for grilling or pan sauteing. Mine took about five minutes per side. Just time it while you prepare the other ingredients. Slice the pita in half, and carefully open the pocket. Chop some lettuce and tomato (I used grape tomatoes and chopped them in quarters). Spread one side of each pita pocket with hummus, and add some salad. Once the burger is done, slice it in half, then quarters lengthwise. Add the burger to the pocket, and fill with the rest of the lettuce and tomato. Drizzle some tahini over all. Enjoy! I am a big fan of Mark Bittman. When I first saw his article Summer Express: 101 Simple Meals Ready in Ten Minutes or Less, I was skeptical. A meal in ten minutes? But I have returned to this article again and again for great last-minute ideas and this one was no exception. While his explanations are one-liners "saute shredded zucchini in olive oil, adding garlic and chopped herbs. Serve over pasta," the directions really let the chef use their own creativity to make the meal unique. This time, his directions, "niçoise salad: Lightly steam haricot verts, green beans or asparagus. Arrange on a plate with chickpeas, good canned tuna, hard-cooked eggs, a green salad, sliced cucumber and tomato. Dress with oil and vinegar" were very to the point, but I had to add something special. I flaked the tuna (I used albacore packed in olive oil), and added 1/4 cup red onion, seasoning with salt and pepper. When I arranged the plates, I placed a bed of lettuce below, then added the tuna mixture to the center. For each plate, I added 1/2 a tomato, 1/3 cup cucumber, some lightly steamed green beans and broccoli, 1/2 can chickpeas, and hard-boiled eggs to finish the meal. Lightly season with salt and pepper, and drizzle with white wine vinegar and olive oil. Enjoy! I love summer picnics. Take your friends and your dog (if puppies are allowed), and go outside to eat in nature... or "nature" if you live in the city! This time I was yearning for roast beef, but wanted something a little different from the usual mustard or mayo. I modified one of my favorite beef sauces to spread on the bread. Add some chips and fruit salad (don't forget the iced tea!) and you're ready for a picnic. I sadly missed a going-away picnic yesterday. The weather and my work schedule didn't allow me to get there... Bon voyage, Kelsey! I know you'll be amazing! You can read about her exploits at Shanghai'ed. You'll need: 1 demi-baguette 5 slices roast beef 2 slices fresh tomato, halved 3 leaves lettuce, ends trimmed 1 slice red onion, separated in half-moons Horseradish spread, recipe below For the Horseradish Spread: 2 tbs prepared horseradish 1 tbs Dijon mustard 2 tbs Sour cream Salt and pepper, to taste First make your spread. Mix the horseradish, dijon and sour cream, and season a bit to taste. Note: taste your spread. If you like it a bit spicier, feel free to add more horseradish or Dijon, and remember the other ingredients will make the end result less spicy! Slice your demi-baguette almost in half, leaving one long edge intact. Spread with all of the horseradish spread. Layer in the meat, tomato and onion, and season to taste. Add your lettuce and, using the back of a knife, carefully fold it into the sandwich so you can close it. Slice your sandwich in half, and wrap for easy carrying. Serve with your favorite picnic foods. Enjoy! My favorite marinade ever is my mom's pork loin marinade. But I had just made pork, so I thought, why not try the same marinade on chicken (pork is the "other white meat" after all!)! I was so happy with the results! The chicken was moist and perfect (I hate dry chicken breasts!!) and the marinade is so versatile, you can use this chicken for practically anything, from casseroles and pasta dishes, to this light and healthy salad. We ended up only using part of one of two chicken breasts for the salad, and the leftovers lasted a few days, making this a great make-ahead chicken dish. I wonder if this marinade would work on fish...? For the marinade, you'll need: 2-3 large cloves garlic, minced 2 tsp salt 1/2 tsp rosemary 1/2 tsp thyme 1/8 tsp powdered allspice 3 tbs olive oil 1 lb boneless skinless chicken breasts For the salad: Romaine lettuce 1/2 red apple, cored and cubed 1/4 cup red onion 1/3 cup walnuts or pecans For the Dijon dressing: 1 tbs white wine vinegar 1 tsp dijon mustard Salt and pepper, to taste 1/4 cup olive oil First, whisk together the ingredients for the marinade and slather them all over the chicken in a large zip-top bag. Let marinate in the fridge for an hour or (preferably) overnight. When you're ready to cook, preheat the oven to 400 degrees. Place the chicken with any extra marinade in a greased baking dish, and cook for 30-40 minutes, or until cooked through but still moist. Let rest while you make your salad. Chop the romaine, apple, and red onion and mix in bowls. Now mix your dressing. Blend the vinegar and mustard and season to taste. Whisk in the olive oil to emulsify. Chop some of the chicken (or all if you want more protein in your salad), and top the salads with the meat as well as your nuts. Dress lightly, reserving extra dressing in the fridge for future use. Enjoy! Last week, a friend of mine had a movie viewing party to watch the original 1975 Stepford Wives. He enlisted my help for Stepford-inspired bites and cocktails, as he knew he wanted to serve a casserole for dinner. He gave me the idea for a finger sandwich, but Dave Lieberman came up with this exciting recipe. He kicks these sandwiches up by using red horseradish. Something I never realized is the difference between the red and white prepared horseradish. I just thought it was a different variety of horseradish, but the white horseradish is cured in vinegar, while the red horseradish is cured in beet juice. Holy moly, is this delicious! The beets really give the horseradish a beautiful earthy flavor that just makes this dish perfect! For 10 or 20 sandwiches, depending on how small you slice them: 1 large English cucumber 4 tbs butter or butter substitute, room temperature 2 scallions, minced 2 tbs chopped fresh dill 1 tablespoon red horseradish Salt and pepper, to taste 10 slices thin white or wheat bread, though white would be more traditional To start, thinly slice the cucumber (first peel it if you want, or if it's not an English cuke). Place the slices on a paper towel-lined plate, cover with a second paper towel, and let rest for about fifteen minutes to get some of the moisture out of the cucumber. Meanwhile, mix the butter with the scallions, dill, horseradish, salt and pepper. Now lay out the slices of bread and spread some of the butter over one half, place the cucumbers over it, and spread the rest of the butter over the second slice and close the sandwich. Slice in halves or quarters, depending on how many people you plan to serve. I'd make extra sandwiches, though, as these went fast!! I have been craving salad lately. The fresh veggies, the crisp lettuce, and homemade dressing. I'm no stranger to the bottled kind, but there's something about whisking up my own that I love. First of all, you know exactly what's in the dressing, and secondly, you can tweak it if you like more lemon, or more dijon! I made my own crutons this time, too. They were simple to make, and just as garlicky as I wanted. I made this dish for an entree, but you can just as easily eat it for lunch or a starter if you want. Your guests will never believe that you made this whole salad from scratch... except if you're like me, and used crust-on whole wheat bread for the crutons! For Each Salad: 1 cooked boneless skinless chicken breast (recipe below) 4-5 romaine lettuce leaves per person, chopped 1/8 cup grape tomatoes, chopped or halved For the Crutons: 2 slices bread (whichever kind you desire) 2 cloves garlic olive oil For the Dressing: 2 tbs Mayo 1 tbs fresh lemon juice 1/2 tsp Dijon mustard 1 minced garlic clove 1/2 tsp + a bit more Worcestershire sauce 1/4 cup extra virgin olive oil salt and pepper, to taste Parmesan cheese to finish First, cook the chicken if you don't have leftovers around. Preheat the oven to 400 degrees. Chop your garlic (1 large clove), and juice your lemon (juice of 1/2 a lemon will do). Spray your pan with baking spray, and season the chicken to taste. Drizzle some olive oil over the chicken, and pour over the garlic and lemon juice. Roast for about 30 minutes, or until the chicken is cooked through. Set aside and let cool. Lower the heat of the oven to 325 degrees. Chop the crust off the bread if desired, and cube it evenly. Toss with chopped garlic, olive oil, salt and pepper. Set in an even layer on a greased baking sheet, and roast for 20-30 minutes, tossing after 10 (if you want to get crazy, you can add the crutons to the oven with the chicken for the last ten minutes the chicken is roasting and lower the heat, switching the pan from the bottom rack to the top, when the chicken is removed). Now get the lettuce and tomato chopped and ready to go. Make the dressing by whisking the mayo, lemon juice, dijon, garlic, worcestershire, salt and pepper. Slowly add the olive oil as you whisk to emulsify. Note: the chicken, crutons, and dressing can all be made in advance. Now assemble the salads. I like to drizzle dressing just on the lettuce and toss to evenly coat. Then I top with the tomato, chicken, and crutons, and add a bit more dressing over all. I think layering the salad like this keeps it pretty. Add parmesan cheese to taste, and enjoy! Even though this week has been rainy and cold, I've been yearning for summer dishes hot from the grill. My grill pan has gotten tons of use lately, from chicken to steak; so I wanted something different. Although I love beef burgers, I really want to keep eating better, so I used turkey meat. I experimented with different mix-ins this time, and added tomato paste and Worcestershire sauce to help keep the meat moist. I love red onion with turkey burgers, and they really came out great! I made my usual sweet potato fries on the side. Top the burgers off with whole wheat buns and cheese and you've got a great and healthy springtime meal! You'll need: 1 pound of ground turkey 1/4 cup red onion 1/2 tsp garlic powder 1/2 tsp smoked-sweet paprika Dash of ground chipotle pepper 1/4-1/2 tsp Worcestershire sauce 2 drops hot sauce (I used Cholula) 1 tsp tomato paste 3-4 fresh basil leaves, chopped Salt and pepper 2 small or 1 large sweet potato, sliced in fries non-stick spray olive oil First, make the fries: preheat the oven to 400 degrees. Line a baking sheet with foil and spray with cooking spray. Chop the sweet potato in fries and toss with about a tablespoon of olive oil, salt, and pepper to taste. Spread the fries in an even layer on the prepared baking sheet, and bake for 20-30 minutes, or until golden brown, mixing once during cooking. Mix your ground turkey with the red onion, garlic powder, paprika, chiptole, Worcestershire sauce, hot sauce, tomato paste, basil, salt and pepper. Form four patties, and set aside. Heat your grill pan to high heat: until water dripped on it beads and instantly evaporates. Spray the pan with cooking spray, and add the patties, one by one. Cook the burgers for 3-4 minutes on each side, until cooked through. I like to flip the burgers twice more for great grill marks and to ensure the center is cooked, just a minute on each side. This is where you can add a slice of cheese, if desired. Serve the burgers on a whole-wheat bun with lettuce, tomato and onion and your choice of condiments; the sweet potato fries on the side. Enjoy! I love recipes like this one, they're the reason why I started this blog. This was my grandmother's recipe, and I love being taken back to her kitchen by making this dish. I can also remember my mom making it in her kitchen, too. I love food that spans generations, that has a history. This dish is not exactly a souffle, but my grandmother called it that because of the eggs. It's also a versatile dish. You can make it for a lot of different occasions, from pot lucks to picnics. I love the zucchini because it keeps the dish moist and unifies the Italian flavors. Definitely go for more zucchini as opposed to less here, as the dish will be drier without. I made mine in a 7x11 baking dish, but my mom usually makes hers in a circular tart pan. Thank you, Mom, for teaching me the importance of nutritious and delicious food, and for always sharing wonderful recipes (like this one) with me. Happy Mother's Day: I love you! You'll need: 1 cup Bisquick or other baking mix 1/2 cup chopped yellow onion 1 finely chopped garlic clove 1/2 cup Parmesan cheese 2 tbs dried parsley 1/2 tsp dried oregano 1/2 tsp salt 1/2 tsp pepper 4 beaten eggs 1/2 cup vegetable oil 3 cups thinly sliced zucchini (about 3) Spray a baking dish with cooking spray, and preheat the oven to 350 degrees. Mix the onion, garlic, cheese, herbs, salt, pepper and baking mix. Add the eggs and vegetable oil. Mix well. Using a mandoline or a sharp knife, carefully slice the zucchini as thinly as you can. Add some of the zucchini to the batter, and use the rest to make a decorative pattern on top of the mix. If I'm unsure of how many I'll need for the top, I'll lay them out on a cutting board next to the baking dish to test. Bake for 45 minutes, or until the top is golden brown. Serve hot as a main dish or side dish, cold as a picnic dish, or cut in squares as an appetizer. Enjoy! The Waldorf salad, named after the famous Waldorf-Astoria Hotel where it was invented, is one of my favorite salads. I love the apple, the nuts, the sweet-tart dried cranberries; everything has a perfect balance, especially with the lemony mayo-based dressing. Speaking of mayonnaise, it's a great base for salad dressings: I use it in Caesar dressing instead of the raw egg, and one can use it in Russian dressing as well as for tartar sauce. I also know that there are as many ways to make a Waldorf salad as there are people in New York! Mine is pretty basic, but sometimes I add candied pecans instead of walnuts--yum! You'll need: 1 chicken breast, cooked and diced (I roast mine in a 400 degree oven with some onions, garlic, olive oil and wine for about 35 minutes, let cool until you can chop) Handful of baby arugula for each plate 1/8 cup diced red onion or shallot 1 red apple, cubed 1/4 cup dried cranberries 1/4 cup chopped walnuts (or candied pecans) 1 stalk celery, diced For the dressing: 2 tbs mayo 1 tbs lemon juice Salt and pepper Arrange the lettuce on your plates. Make your dressing by carefully whisking together the mayo and lemon juice, seasoning to taste. Mix the chicken, apple, onion, cranberries, walnuts, and celery, and toss in the dressing. Top the lettuce with the chicken mixture, and season all with some freshly ground pepper. Enjoy! |
Categories
All
Archives
July 2015
|