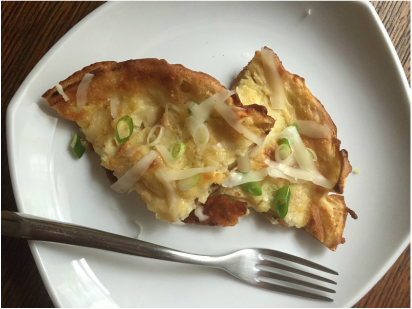
To serve two, you'll need: 2 tbs unsalted butter 1 large egg 1/4 cup milk 1/4 cup flour 1/4 tsp salt 1/8 tsp pepper 1 scallion, chopped, light green part reserved for garnish 2 tbs shredded cheddar cheese, plus more for garnish optional: cooking spray To make this German Pancake, get out a small oven-safe skillet (mine looks like a mini wok and is 8 inches wide) and set your oven to 425 degrees. If desired, lightly spritz the pan with some cooking spray. Place the butter in the skillet. | I have stayed away from German Pancakes, or Dutch Babies (as they are often called), for no other reason than laziness. But after reading this article, I decided to try it... and It is delicious! Whipping the batter in a blender really keeps it airy and light, and the dramatic puffiness right out of the oven makes it an easy show-stopper for a romantic brunch for two. The taste is a lot like a crepe because of the high egg content of the batter. I added the savory addition of scallions and cheddar, treating this pancake a bit like I would a biscuit. It came out very beautifully, but I had to be careful of the salt content. Adding the cheddar to finish on top added some additional salty flavor. My pancake also slightly stuck to the bottom of my pan. I may do a light spritz of cooking spray before cooking next time. I hope you like this tasty brunch dish! |
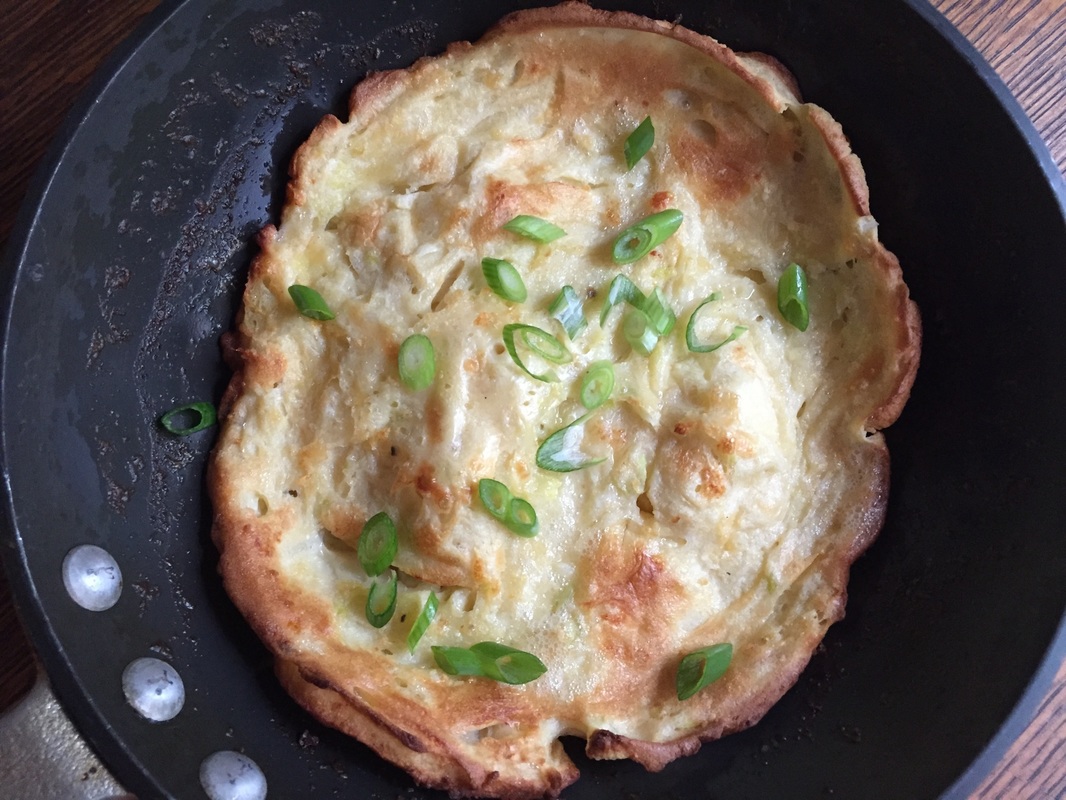
When you've got all your ingredients ready, place the skillet in the oven, to allow the butter to melt. Use a blender to whip up the egg for a minute, then add the flour, milk, salt and pepper. Blend until well-mixed, then add the scallion and cheese, blending for a minute more. Using an oven mitt, take the skillet out of the oven, making sure that the butter is melted. Carefully swirl the pan, to coat all the sides with butter. Gently pour the batter into the skillet, and bake in the preheated oven for about 15-17 minutes, or until the outside is golden and the middle is puffed up. Cut into quarters, and serve immediately with the reserved scallion and cheddar on top. This would be great with a few slices of bacon or sausage alongside. Enjoy!
0 Comments
I have never gone from watching an episode of a show to making the recipe faster than this one. First of all, hello! How are you? I have been away for quite a while, but I am glad to say I hope to be writing more soon! I recently went from a part-time to a full-time job, and I couldn't be happier! When I saw this cookie recipe on Anne Burrell's Secrets of a Restaurant Chef, I knew I had to try it. After making these spicy cookies, Anne made some ginger ice cream to go with them. That sounds like an amazing combination. The spicy cookies with cool ginger to add depth of flavor as well as a creamy component sounds like a great treat for a party. While I didn't get to make these cookies into ice cream sandwiches, I plan to go out and buy Haagen Dazs Five's vanilla bean ice cream (or the ginger flavor, if I can find it!) to do just that as soon as possible. 2 1/2 cups all-purpose flour 2 teaspoons baking soda 1 teaspoon ground cinnamon 1 teaspoon ground ginger 1/2 teaspoon ground cloves Pinch salt 1 1/2 sticks butter, at room temperature 1 cup brown sugar 1 egg 3/4 cup molasses Turbinado sugar (sugar in the raw), for coating Preheat the oven to 350 degrees F. In a medium bowl, combine the flour, baking soda, cinnamon, ginger, cloves and salt and set aside. In the bowl of a standing mixer fitted with the paddle attachment, cream together the butter and brown sugar until light and fluffy. Beat in the egg and then the molasses. In thirds, gently mix in the flour mixture until just combined. Using an ice cream scoop or a large melon baller, scoop out the cookie dough into 1-inch balls onto a sheet tray covered with turbinado sugar (Note: I used regular granulated sugar and they came out great. The texture would probably be better with the other sugar, though). Gently toss the cookies in the sugar, covering them completely. Place the sugar-coated dough balls on another sheet tray and gently squish a little. Bake for 9 to 10 minutes. Remove the cookies to a rack to cool. Serve with fresh whipped cream, a small dollop of cream cheese or mascarpone, or make into ice cream sandwiches using ginger or vanilla bean ice cream! Enjoy! When my friend Danny suggested we try a rabbit sauce, I was skeptical. Before this, the only rabbits I've eaten were made out of chocolate. But, being an adventurous eater, I said, "let's go for it!" Buying the rabbit was a bit interesting. After shopping around, a great butcher in Astoria both defrosted ours and chopped it into the required number of pieces. Other than taking the meat off the bone, this is an easy and straightforward recipe. Yes, it is time-consuming, but it's worth it to at least try something new. I was surprised at the taste of the rabbit meat. It was definitely chicken-like, but there was a woodsy, almost sweet flavor as well that went perfectly with the sage and cinnamon--what a great Fall dish! Recipe is from the Dean & DeLuca Cookbook For 1 lb. pasta, you'll need: 1/4 cup olive oil 3/4 cup diced onion 3/4 cup diced celery 3/4 cup diced carrots 1/4 lb. bacon, also diced 1/4 cup flour 1 tsp salt 1/2 tsp black pepper 1 3lb. rabbit, cut into 8 pieces 1 cup dry white wine 5 cups of chicken stock 1 cup water 2 tbs tomato paste 1 tbs chopped fresh sage 1 cinnamon stick Optional: 1/4 lb grated Pecorino Romano cheese 1) Heat olive oil over medium heat. Add onion, celery, and carrot and cook until soft, about five minutes. Add bacon. Cook until bacon is soft but not crispy, five to seven minutes. Remove bacon vegetable mixture and reserve, leaving the oil and rendered bacon fat in the pot. 2) Combine flour, salt and pepper on a plate. Rinse and dry meat and coat with the flour. Brown rabbit well, a few pieces at a time, and reserve. Drain excess fat from pan. 3) Add wine to pan and boil for two minutes, scraping up the brown bits from the bottom. Return rabbit to pan with the vegetable mixture. Add the chicken stock, water, tomato paste, sage and cinnamon stick. Stir well. Partially cover pan, reduce heat, and simmer gently for 45 minutes. Remove meat from pot, and, when cool enough to handle, remove meat from bones. Shred meat coarsely and return to pan. 4) Simmer uncovered for an additional 45 minutes, or until the sauce is nicely thickened and the meat is stringy and tender. Remove cinnamon stick from pot. 5) Toss with hot pasta and serve with cheese. When I first saw this recipe in Jamie Oliver's book: Happy Days with the Naked Chef, I was taken aback. Even though it sounded more than a bit unusual, I decided to try it. That was over five years ago, and I have loved this dish ever since! The milk separates while it cooks and creates this beautiful sauce, and the sage and cinnamon make it perfect for fall. Although the recipe calls for a whole chicken, I find it easier to use a chicken in pieces (or just legs). This time I served this dish with store-bought gnocchi mixed with steamed broccoli, but it would be great with mashed sweet potatoes, or mixed veggies and some great bread--don't waste that sauce! You'll need: 1 (3 pound) organic chicken, or 3lbs chicken pieces Salt and freshly ground black pepper 4 ounces or 1 stick unsalted butter 1/2 cinnamon stick 1 good handful fresh sage, leaves picked Zest of two lemons, in large strips 6 garlic cloves, skin left on 1 pint (2 cups) milk 1 pkg gnocchi 1 head broccoli, chopped Preheat your oven to 375 degrees, and find a snug-fitting pot for the chicken (that's also deep enough for the milk). Set the pot over medium-high heat. Season the chicken generously with salt and pepper, and fry it in the butter; turning to get even golden color all over. Remove the pot from the heat, set the chicken on a plate to rest, and discard most of the butter from the pan (but leave any sticky brown bits--this helps form the sauce). Place the chicken snugly in the pot, and add the rest of the ingredients. Cook in your preheated oven for 45 minutes to an hour (if using pieces) or up to an hour and a half (for a whole chicken). Baste the chicken every once in a while. Just before you take the chicken out of the oven, set a pot of salted water to boil for your sides. Remove the chicken from the oven, and let it rest while you cook the gnocchi (according to the package directions) and broccoli (steamed to your liking, or cooked in the boiling water before the gnocchi). Serve the chicken over the gnocchi, with plenty of sauce. Enjoy! With the onset of cooler weather, I have been yearning for recipes from my youth. Comforting foods to keep me warm and cozy. My mom sent me this recipe, which she says is from the magazine Women's Day from around 1970! What a classic! The original recipe called for canned mushrooms, but since fresh mushrooms are so readily available, I used a pint of fresh button mushrooms instead. Some of the ingredients seemed interesting on paper, but everything came together perfectly and was just the way I remember! For the noodles, I used No Yolks Egg Noodles in the dumpling size--perfect to hold all that delicious sauce! To serve four, you'll need: 3 tbs Vegetable oil 1 medium yellow onion, sliced in half-moons 1 pint button or baby bella mushrooms, cleaned and thinly sliced 1 pound ground beef (my mom would use strips of tender meat, but ground was easier for me) 3 beef bullion cubes 1 cup hot water 1/2 tsp salt 2 tbs ketchup 1 tsp dry mustard 2 tblsp flour 1/2 cup cold water 2 tblsp dry sherry (optional--I used dry vermouth) 1 cup Sour cream 1 package wide egg noodles, tossed in a little butter or margarine Heat oil in skillet or wok over moderate heat; add onions and cook for two minutes. Add mushrooms and cook for three minutes, or until vegetables are tender. Add meat and brown on all sides. Add bullion, water salt, ketchup and mustard. Heat to boiling. Reduce heat to medium low and simmer uncovered for about 10 minutes. Cook noodles according to package directions. Drain and toss with some butter or margarine. Set aside. In a small bowl, combine flour, water and sherry (or vermouth) and stir until smooth. Gradually add flour mixture to meat mixture while stirring constantly. Bring to the boil and cook 1 minute longer. Lower the heat, add the sour cream and cook until just heated through, but do not boil. Serve over noodles. Enjoy! I was never a succotash person. First of all, I think lima beans are flavorless and dry. Not something I would make without a hefty bribe. But I love corn, tomatoes and zucchini, so I wracked my brain to find a suitable substitute for limas. I looked in the frozen food section of the store, and my easy answer was edamame--whole soy beans! They're good for you, high in protein, and a fabulous addition to this dish. Originally, Ellie Krieger made this dish with scallops, but they are also on my no-thank-you list. Feel free to saute a few and use those instead of the salmon. The parsley sauce just freshens up the dish and makes sure that you'll miss the summer that is quickly fading into crisp leaves and apple pies... You'll need: 1 teaspoon olive oil 1/2 onion, diced 1 clove garlic, minced 2 ears corn, kernels removed 1/2 (10-ounce) package frozen edamame beans, thawed 1/2 medium zucchini quartered lengthwise and sliced 1/2 pint grape tomatoes, halved Good squeeze of fresh lemon juice 3/4 lb Salmon fillet Salt and pepper 1 cup lightly packed fresh flat-leaved parsley 2 tablespoons extra virgin olive oil 1 tablespoon fresh lemon juice 2 tablespoons water, if needed to thin the sauce Set a pan over medium heat. Add the olive oil, then the onion, stirring. Let cook for a minute, then add the garlic, corn kernels, thawed edamame, zucchini and grape tomatoes. Lower the heat slightly and let cook on a back burner while you make the salmon. Heat a grill pan over high heat, season the top of the fillet, and spray the pan with cooking spray. Lay the fillet, skin side down into the grill pan and cook for two minutes. Flip the salmon and cook for two minutes more. Now flip again, turning the salmon to make x-shaped grill marks. Cook for one minute on each side and set the salmon aside to rest (note: if your fillet is thicker, you might want to give it an additional minute or two of cooking). Finish the succotash with a squeeze of lemon juice and turn off the heat. Now make the parsley sauce by adding the parsley, olive oil and lemon juice to a blender. Blend to puree. If needed, add some water to thin the sauce. Serve the succotash with the salmon on top and some of the parsley sauce drizzled over all. Enjoy! My friend Danny and I have been using a fabulous cookbook lately: The Dean and DeLuca Cookbook. We have only made a few recipes from this book, but we are always wowed by the results as well as the wonderful flavor combinations. What drew us in to make this recipe was the fennel, the olives, and the surprising addition of orange zest. We also loved that in a sea of predictable tomato sauces loaded with cheese, this recipe has minimal tomatoes and no cheese whatsoever! This is a perfect late-summer dinner to try with friends, complete with a crisp sauvignon blanc! You'll need: 1/4 cup extra-virgin olive oil 1 pound fennel bulb, cut into thin julienne strips 2 small red onions, peeled and sliced into thin rings 4 garlic cloves, slivered 1 1/4 teaspoons Herbs de Provence 10 plum tomatoes (about 2 1/4 pounds), peeled, seeded and chopped--we used canned Two 3-inch strips orange zest removed with a vegetable peeler plus 2 teaspoons finely grated orange zest Salt and pepper to taste 3/4 cup packed fresh basil leaves 3/4 cup packed fresh parsley leaves 18 picholine olives (or other green olives), pitted and chopped 18 niçoise olives (or other black olives), pitted and chopped 2 tablespoons drained capers, packed in vinegar and brine 1 lb spaghetti (recommended. We used ziti) Heat the olive oil in a large skillet over moderate heat. Stir in the fennel, red onions, garlic, and Herbs de Provence, and cook, stirring frequently, for 40 minutes, or until the vegetables are very soft and golden brown. Stir in the tomatoes and strips of orange zest, and cook over moderate heat, stirring occasionally, for 20 minutes, or until tomatoes have formed a sauce. Discard the orange zest strips. Season to taste with salt and pepper. Mince together the basil, parsley, olives, and capers. Toss hot pasta with the 2 teaspoons of grated orange zest, then with the fennel sauce, then with the basil olive mixture. Serve immediately and enjoy! I saw this recipe on an episode of Laura Calder's French Food at Home, and I knew I had to try it. I wanted a fancy appetizer to begin a fancy meal, and this turned out awesome! I usually get shrimp that has been previously frozen, and I never love the results. There's always something less-than-fresh about the dish. This time Agata & Valentina came to the rescue: some gorgeous large shrimp were on sale, and they were so fresh that when I opened the container, they smelled only of the sea! To round out the skewers, I added a small salad with avocado, corn, and extra zucchini I didn't use to skewer. It was a perfect start to my fancy dinner. For two, you'll need: 1/2 lb large shrimp, peeled and tailed (8-9) Thin zucchini ribbons (you'll need one medium zucchini for both parts of the dish) 2 tbs olive oil 1/4 tsp red pepper flakes 1 1/2 tsp chopped fresh mint or basil Salt For the salad: 1/2 ripe avocado Kernels from 1 ear cooked corn 1/3 cup chopped zucchini Lemon juice Olive oil Salt and pepper First, rinse, shell, and de-vein the shrimp, removing even the tails. Then lightly toss with the olive oil, red pepper, chopped mint or basil (I used basil), and a bit of salt. Let marinate in the refrigerator for an hour or two. Meanwhile, if using bamboo skewers, let them soak in water for at least an hour. Right before you want to cook, chop your avocado and mix with the corn and some of the zucchini (I made my ribbons first with a vegetable peeler, then added some of the leftover zucchini to the salad). Lightly dress with a squeeze of lemon juice and a drizzle of olive oil. Season to taste and set aside. Preheat your grill pan to high heat. Carefully skewer the zucchini ribbons around the shrimp (use 2-3 shrimp per skewer). Pour the extra marinade over your finished skewers, and spray your grill with cooking spray. Carefully lay your skewers on the grill and grill the shrimp for 3-5 minutes per side, or until they are perfectly pink and slightly charred. Serve with the salad on the side and some fresh lemon wedges. Enjoy! After tackling Hummus, I knew this one was next. Baba ghanoush is another classic dip, and I love eggplant, so I knew I wanted to try it. This is yet another recipe from The Shiksa, and I love her approach to food, and the history of food. Do check her out! I served mine with some grilled pizza dough, but it turned out a bit chewy for my taste. I'll probably just buy some naan next time or look for a real flatbread recipe. The roasting of the eggplant was easier than I thought: and because I set a timer, I just hung out near it (to be sure everything was safe, of course) and it was done in a jiffy. The shiksa lists other ways to roast eggplant if you don't have a gas stove. You'll need: 1 medium eggplants (1 1/2 lbs.) 1/6 cup tahini (from light seeds, not "dark tahini") 2 roasted garlic cloves Juice of one lemon 1/4 tsp cumin 1/4 tsp salt, or more to taste Pinch of cayenne pepper 1 tbsp minced fresh parsley (for garnish) Paprika (for garnish) Extra virgin olive oil First, you want to roast your garlic and your eggplant. Preheat your oven to 400 degrees. Chop off the top of the garlic, so all of the cloves are exposed. Drizzle with a bit of olive oil and wrap tightly in aluminum foil. Roast for 30-45 minutes, or until the cloves are soft and fragrant. Set aside to cool. For the eggplant: poke some holes all over the eggplant to vent, and wrap tightly with multiple layers of aluminum foil. Turn on your burner to medium-medium-high (just over medium) heat, and place the wrapped eggplant directly on top of it. Rotate a quarter turn every five minutes for 15-30 minutes, until the eggplant is very soft. Let cool for a bit before you open the foil, as it is very hot! Slice open the eggplant and scoop out the flesh into a bowl. Discard the charred skin, but reserve the liquid that collects in the foil. Drain some of that liquid into the bowl with your eggplant. Let cool to room temperature. Add tahini, garlic (just squeeze each clove from the skin), lemon juice, cumin, salt, cayenne pepper and 1 1/2 tsp extra virgin olive oil to the bowl. Use a fork to mix everything together until it has a smooth consistency (don't be daunted--this was much easier than I thought it would be!). Taste your dip. Add more lemon, garlic, or anything else you might want to cater to your taste. Drizzle lightly with olive oil, and sprinkle with parsley and paprika. Serve with good bread, sliced vegetables, or naan. Enjoy! I'd been yearning for a summery pizza, and this one took the cake. I find I over-top my pizza a lot, adding topping after topping when I'm feeling uninspired. This time, I started with a white pizza, then added summery zucchini, some garlic and basil, and topped all with a few red pepper flakes. For me, it was sparse, but it came out lovely. I have a beautiful red basil plant that I've been dying to use, and the colors are perfect with this pizza. I ate this with a side caprese salad, with more of the red basil. Perfect for a summer dinner, an appetizer for a party, or cold as a midnight snack. I'll definitely be more choosy with toppings in the future! For the dough, you'll need: 1 1/2 cups flour (I used 3/4 cups whole wheat) 1 tsp salt 3/4 tsp active dry yeast 1/2 cup lukewarm water 1 tbs olive oil 3-4 tbs ricotta cheese 1/4 cup mozzarella cheese 1/8 cup Parmesan cheese 1/2 zucchini, thinly sliced 2 garlic cloves, thinly sliced and dressed in olive oil 5 basil leaves, sliced Red pepper flakes, to taste Corn meal, for the baking sheet Start your dough about an hour and a half before you want to eat. Mix the flour, salt, and yeast, and add the water and the oil and mix just to blend. Knead the dough for as long as you like (if I'm using my mixer with the dough hook attachment, I'll set it to mix for about fifteen minutes). Roll the dough into a ball, lightly coat your bowl with oil, and roll the dough around to evenly coat it. Cover the dough with plastic wrap, and set in a warm place to rise for an hour. Punch the dough down and re-form into a ball. Cover the dough again with the plastic wrap, and let it rise a second time for about twenty minutes. Meanwhile, slice and prepare the toppings. When the dough is ready, place it on a clean surface, and stretch it out into a pizza shape (when I use whole wheat flour, I like to roll it out). Preheat your oven to 500 degrees, and spread some cornmeal over your baking sheet. Place the pizza on the baking sheet, and layer on the toppings. Evenly spread out the ricotta cheese, and then top with the other cheeses. Then the zucchini, the garlic (but as little of the oil as possible), and the basil. Top with your red pepper. Bake for ten minutes, or until the top is brown and bubbly. Enjoy as soon as possible (it'll be quite hot)! |
Categories
All
Archives
July 2015
|